Showing posts with label Kimchi. Show all posts

Thursday, February 7, 2013

Pizza Experiment #6: Kimchi Pizza with Bacon on a Beer Bread Crust

This is a dearly beloved brain-child of mine which I believe will have only a handful of lovers, yet for me, it is worth it!

I've lived in South Korea. I've mastered the art of making and fermenting Kimchi. And now I'm bringing the two worlds - East and West - together in a truly delectable fashion.

I was pleased with this pizza experiment. And truth be told, so were our guests (all family...who did visit us in South Korea). Definitely something that has potential to be a 'signature' dish.

And, I tried out another Beer Crust, with much success!

Photobucket


Raised Beer Bread Pizza Crust:

You can either throw these ingredients into your bread machine per bread machine directions (our machine requires wet ingredients on bottom). Or you can follow these simple directions:

Mix together 4 cups Flour, 2 1/2 tsp. Active Yeast, 1 tsp. Baking Powder, and 1 1/2 tsp. Salt. Add to these dry ingredients 2 Tbsp. Olive Oil and 1 1/2 cups Beer, mix together.

Turn out onto a floured surface and knead about 10-15 minutes.

Place in lightly greased bowl, cover and let rise until about doubled 2-3 hours. Proceed as with other crusts.

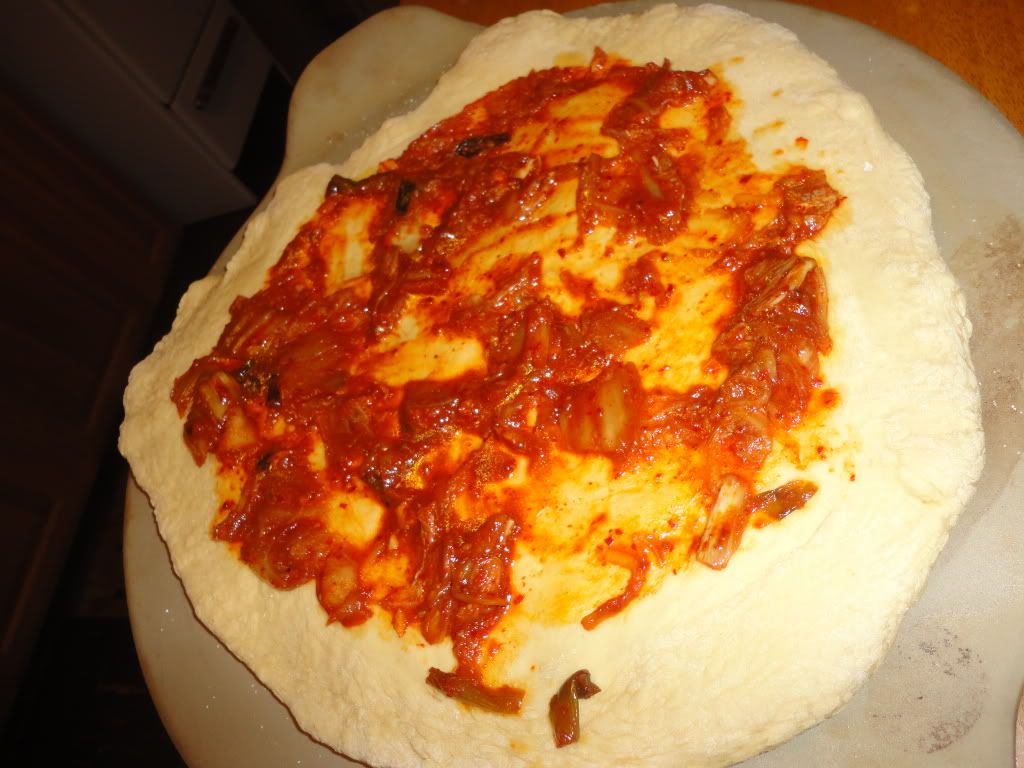
For the 'sauce', I heated up a bit of Sesame Oil before tossing in some fermented Kimchi, Soy Sauce and Go-ju-chang (Korean red pepper paste). This was then spread on the crust, topped with Mozzarella Cheese and Green Onions.

Photobucket


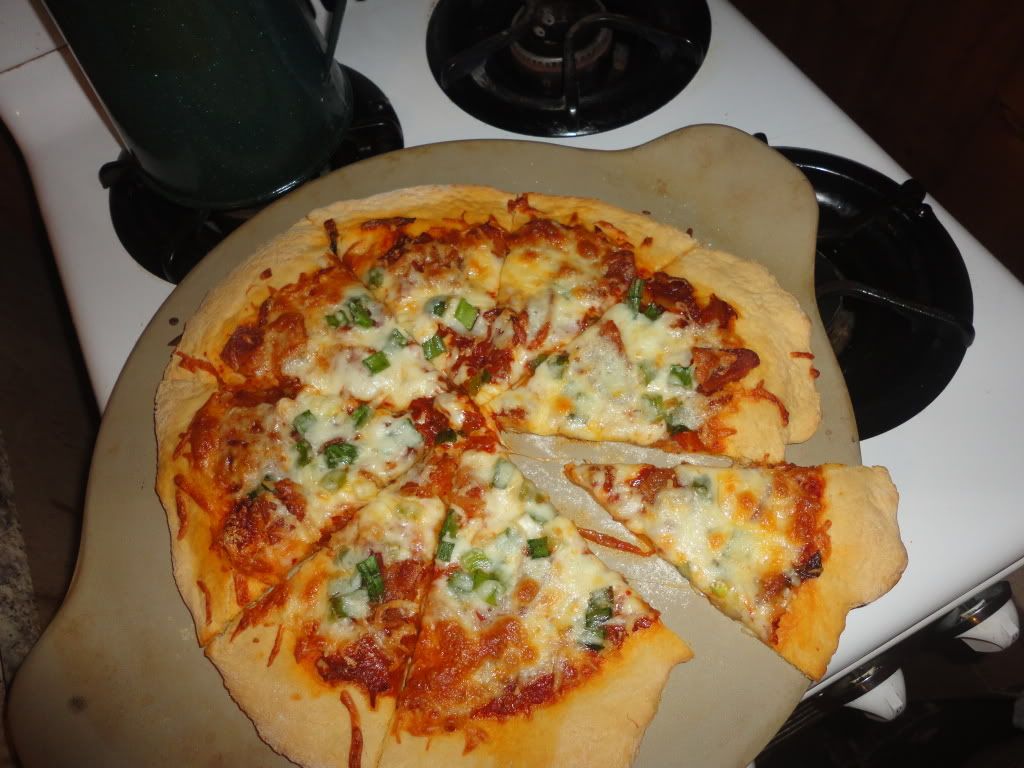
Definitely unique and ultimately, delicious!

Monday, November 26, 2012

Turkey Kimchi Chigae

Extended Shelf Life for: Mushrooms, Onions and a Turkey Carcass
Photobucket
With my recently fermented kimchi and the end of the first round of Turkey eating for the Thanksgiving holiday and the winter chill setting in, I was craving some Kimchi Chigae.

However, unlike my go-to Kimchi Chigae recipe, I used my turkey carcass to make a large batch of turkey broth, much in the same way that I make chicken broth and therefore was able to use Turkey Broth and the turkey pieces to add some meat and flavor to this pot of stew.

But that's just the great thing about stews and soups in general, they're easy to substitute and recreate...

Sunday, November 11, 2012

Kimchi!

If you need to extend the life of cabbage, this is a great option. However, we simply needed to have some kimchi re-enter our life and this includes nothing salvaged, except perhaps an onion.

For me, it was relatively important to prepare some kimchi in November, as November/the fall is generally the time when all the old women come out from the woodwork gathered around piles and piles of cabbage and working together to make sure the Korean staple is ready for the long winter ahead.

A few other notable mentions about my kimchi making day: It was the Korean "holiday" of Peppero Day (11-11) AND I had the great joy of being assisted by a sweet Korean family that is here on behalf of the man of the household serving an exchange as a visiting professor, making my first kimchi experience feel that much more authentic and valuable.

Now, on to Kimchi making...

There are essentially three parts to preparing Kimchi: Soaking, Making the Red Pepper Paste and Assembly. I will give you a rough sketch of each one of these parts followed by a link to a very detailed explanation of each step just in case you are in need of more photos and great explanation. 

Part 1~SOAKING:

Photobucket
Kimchi making will undoubtedly be a two day process, starting with this first step which is, in essence, preparing the cabbage by soaking it in salt water.

You will need:
  • Two Heads of Napa/Chinese Cabbage
  • 3 cups Coarse Sea Salt, preferably from Korea -- no joke
  • 30 cups of Water
What you will do:
  • Remove the outer 2-3 leaves from each cabbage, but don't discard!
  • Cut a 2" slit in the stem of each cabbage, carefully split heads of cabbage in half (easier than it sounds, I promise)
  • Salt each leaf of the cabbage, making sure to get plenty of salt on the thick, white parts and extra careful not to tear the leaves or disassemble the cabbage half.
  • In a deep, large container (such as the kitchen sink), dissolve 3 cups of Salt in 30 cups of Water.
  • Place each cabbage half, face-up into the water and cover with the reserved cabbage leaves.
  • Cover with plastic and use rocks, tin cans or a heavy lid to press the cabbage halves down into the water.
  • Soak for 8 hours. Flip and soak another 4 hours.
  • Check for bend-ability in the cabbage stems, when they are supple it's time to rinse (3 times), halve again (so you end up with 8 quarters of a whole cabbage) and drain (at least two hours, during which you should prepare the next step).
For greater details on soaking, check out this thorough post at Beyond Kimchee (my favorite Korean food blog!)

Part 2~MAKING THE RED PEPPER PASTE:
Photobucket
You will need:
  • A few handfuls of dried sea creatures (or one handful if you can't find multiple sea creatures or don't like sea creature flavored items - but one handful is a good idea)
  • 3 cups of Water
  • 2 Tbsp. Sweet, Glutenous Rice Flour
  • 1 Lg. Korean Radish, julienne into 1/8" matchsticks
  • 2 bunches of Green Onion
  • 4 cups of Korean Red Chili Flakes
  • 1/2 large Onion, roughly diced
  • 10 cloves Garlic
  • 2" piece of Ginger, roughly diced
  • 4 (or 2) Tbsp. Anchovy Sauce
  • 4 (or 2) Tbsp. Shrimp Sauce/Salted Shrimp
  • 1 1/2 Tbsp. Sugar
  • 2 Tbsp. toasted Sesame Seeds
What you will do:
  • Make a rice glue by boiling your handful of dried sea creatures in 3 cups of water, simmer for 10 minutes, remove from heat and let set, as is for 20 minutes. Strain off sea creatures and discard sea creatures, reserving 2 cups. Bring 1 1/2 cups of stock to boil while continuously whisking in the 2 Tbsp. of Glutenous Rice Flour until the mixture is bubbly and has thickened. Save the plain 1/2 cup stock for later.
  • In a blender or food processor, puree 1/2 large Onion, 10 cloves of Garlic, 2" piece of Ginger and reserved 1/2 cup Stock until smooth.
  • Pour 4 cups of Korean Red Chili Flakes into a large mixing bowl, add the onion mixture and cooled rice glue, anchovy sauce, salted shrimps, sugar and sesame seeds, mix.
  • Add the sliced Radish and diced Green Onions and let set for 30 minutes so the radish can extract some moisture and the mixture will be come more smooth and spreadable.
  • Taste test the sauce with a piece of cabbage to evaluate saltiness and flavor, adjust with additional fish sauce or stock for spread-ability as deemed necessary, then move on to assembly.
For greater details and more pictorial assistance, check out Cabbage Kimchee: Part Two from, yet again, Beyond Kimchee. 

Part 3~ASSEMBLY:
Photobucket
You will need:
  • Rubber Gloves
  • A Cookie Tray or Large, shallow dish
  • Airtight containers for storage
 What you will do:
  • Gently handle each cabbage quarter and use your gloved hands to spread red chili paste between each and every leaf. Roll up the quarter, place in an airtight container. Let the kimchi sit out on the counter 2-3 days for fermentation and moisture extraction before relocating it to the refridgerator.
  • Our Korean assistants explained that the outer leaves can be used to cover a bit of the kimchi, but that it is also generally spread with red pepper paste and then cut up and eaten that day as fresh kimchi with rice, which, by the way, is delicious!
For more details on this final part of preparing your kimchi, head over to Beyond Kimchee one more time!

In our house, we really love this fermented vegetable and have been beyond satisfied with the results of this recipe and process, slightly time consuming, but if you love fermentation, spicy foods, or kimchi itself, it's well worth it!

Thursday, June 7, 2012

Kimchi Pancakes


Photobucket
As a born and bred American, I generally associate pancakes with Saturday and Sunday mornings, topped with syrup, fruit and whipped cream.

But traveling and aging have introduced me to the joy which is savory pancakes, while I still prefer the sweet syrupy kind for breakfast, these Kimchi Pancakes as well as Spring Onion Pancakes are a delicious and light way to enjoy an evening meal.

As always, for Korean recipes, I use what I know from eating out in Korea and refer to Maangchi to fill in the holes. You can check out her original recipe and YouTube Video here.

Or, you can keep reading and follow my lead ^^

Ingredients/Directions:

In a bowl, mix together, 1 cup chopped Kimchi, 3 Tbsp. Kimchi Juice, 2 Tbsp, chopped Onion, shake of Salt, Sprinkle of Sugar, 1/2 cup Flour and 1/4 cup Water. Heat a non-stick skillet and 2 tbsp. oil to med-high heat. Pour kimchi batter into to hot skillet, spread evenly and thin, cook for 1-2 minutes until bottom is golden brown and crispy, flip and repeat. Serve by cutting into bite size pieces or simply give the eaters their own chopsticks and a bowl of Makgeoli (Korean rice wine) and let them go at both at their own pace.

Perfect on a rainy day ^^

Tuesday, December 13, 2011

Kimchi Jigae

Photobucket

Mike really loves Kimchi -- I can take it or leave it, often I choose to leave it.

But I do love when Kimchi is used IN things and is served hot - such as kimchi fried rice, kimchi dumplings and kimchi stew (aka-Kimchi Jigae).

We were recently gifted fresh and fermented kimchi...a lot of it.  So, fully aware that we won't live in Korea forever, but I will miss certain foods, I set out to finding the perfect kimchi jigae recipe and I definitely found one - the secret is in the 'sauce' pictured bottom right hand corner.

Ingredients/Directions (kind of rough as stew recipes generally imply I don't measure anything...):

In a large stockpot or dutch oven heat some oil and saute an onion or half an onion depending on your taste preferences etc. Once the onions are translucent, shove them to the edge of the pot and dump in about a cup of chopped fermendted kimchi (more or less depending on your preferences again) and heat through. 

Now, at this point you can add meat (or you could do that first, honestly, we don't use a lot of meat so I don't know how that process should go) but we've added any of the following veggies: mushrooms, carrots, potatoes, bean sprouts, fresh cabbage and/or baby bok choy. With carrots and potatoes they'll need some time to boil in a bit of the broth or water so that they are edible, so if that's part of your veggie repertoire, they go in first. Mushrooms can be sauted with the onions if you disire, cabbage and bean spouts can go in after kimchi and I've always thrown the baby bok choy in for the last minute or so of cooking. 

Once you've figured out the order of veggies add broth or water, perhaps 4 cups, but once again it's completely your preference.  Boil the stew for about 10 minutes or so while you prepare the special sauce. Sauce consists of Korean chili powder (I imagine most Asian markets would have this, or you could use an Asian chili powder as a substitute), Korean chili paste (go-juchang), Soy Sauce and Minced Garlic.  I've done 2 tsp Powder, 1 tsp. Chili Paste, 2 tsp Soy Sauce and 2-3 cloves garlic...but it's spicy so think about who's eating the dish and move forward from that point.

Stir in the sauce, throw in some tofu or baby bok choy if you wish. Serve alongside or over rice and enjoy a taste of Korea!

Wednesday, May 25, 2011

Kimchi Fried Rice

Photobucket

We were runnin' the budget ragged this month with Cirque Du Soleil and other big spending events so, it was time to think of cheaper-than-normal meals. I figure...when in 'Rome'...right? Hence, Kimchi Bokkeumbap (Fried Rice). Cheap to eat out, equally cheap to eat at home, especially when you've received a BUCKET of home-made kimchi!

Ingredients/Directions:

You will need about 2 cups of prepared rice (best if prepared a day ahead...so I've heard). In a skillet heat a tablespoon of sesame oil and saute an Onion, chopped, 2-3 Garlic Cloves, minced and 1/2 a Carrot, diced. Add to the skillet as much kimchi as suits your taste buds chopped as finely or not finely as you like. Add rice, season with a bit of soy and gojuchang (?) -- Korean Red Pepper Paste, as much or little as you like. Make space between the rice for an egg or three, crack them on to the pan, let cook mix it up and serve. Can also serve the rice with a fried egg on top if you prefer, but with the rice prevents you from having to wash one more pan ^_^

Tuesday, April 26, 2011

Sweet Potato Breakfast Burrito

Photobucket

As English speakers in Korea like to say: "Let me be frank" or "Frankly speaking..." This was not an all-star dinner. However, it has potential and will not be left to suffer the consequences of non-posting...so here you have it, a recipe which I am less than impressed with but choosing to post for reasons completely unexplainable.

Ingredients/Directions:

Saute in a bit of oil, 2 cloves of Garlic, minced, 1 red onion, diced, and 3-4 small sweet potatoes until the potatoes are tender and/or nearing on crispy.  Before adding eggs, chop up a handful of kimchi and add to the burrito mix. Whisk together 4-5 eggs with a touch of salt, pepper, cayenne and a splash of milk, add to skillet and scramble with the veggies. Scoop into large tortillas, top with cheese, sour cream if available (this could be an ingredient that would make these burritos supreme, I'm not sure), and enjoy for breakfast, lunch or dinner! (In our house, burritos are always placed into the oven or on a dry skillet for a few minutes so the tortilla is crispy and the cheese inside is melty!)
Related Posts Plugin for WordPress, Blogger...