Showing posts with label Korea. Show all posts

Sunday, November 11, 2012

Kimchi!

If you need to extend the life of cabbage, this is a great option. However, we simply needed to have some kimchi re-enter our life and this includes nothing salvaged, except perhaps an onion.

For me, it was relatively important to prepare some kimchi in November, as November/the fall is generally the time when all the old women come out from the woodwork gathered around piles and piles of cabbage and working together to make sure the Korean staple is ready for the long winter ahead.

A few other notable mentions about my kimchi making day: It was the Korean "holiday" of Peppero Day (11-11) AND I had the great joy of being assisted by a sweet Korean family that is here on behalf of the man of the household serving an exchange as a visiting professor, making my first kimchi experience feel that much more authentic and valuable.

Now, on to Kimchi making...

There are essentially three parts to preparing Kimchi: Soaking, Making the Red Pepper Paste and Assembly. I will give you a rough sketch of each one of these parts followed by a link to a very detailed explanation of each step just in case you are in need of more photos and great explanation. 

Part 1~SOAKING:

Photobucket
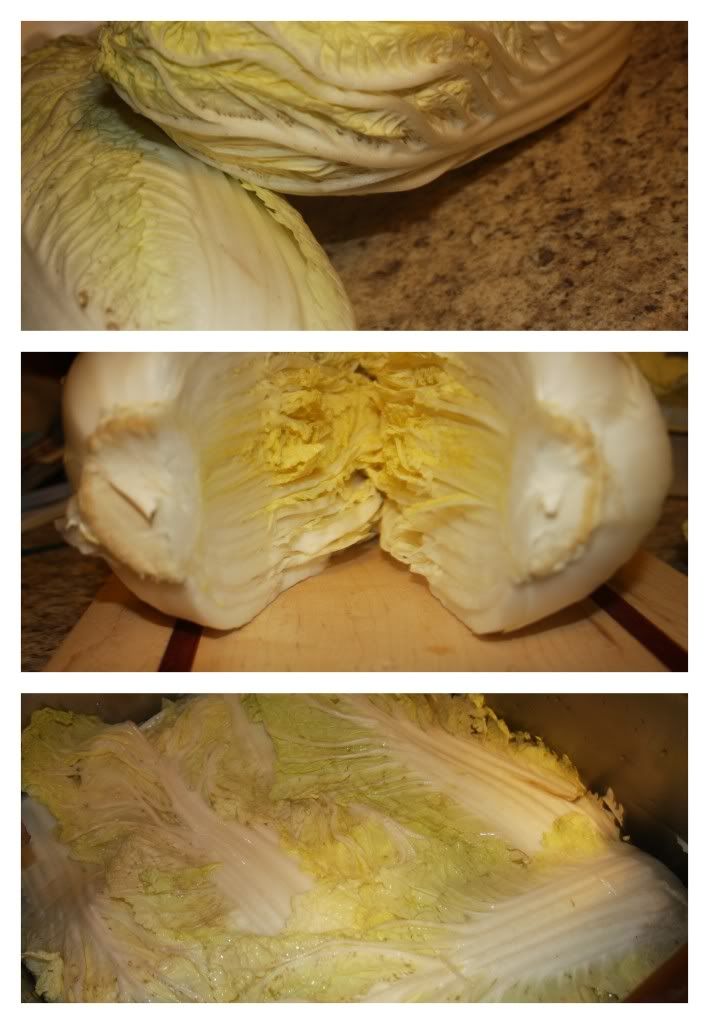
Kimchi making will undoubtedly be a two day process, starting with this first step which is, in essence, preparing the cabbage by soaking it in salt water.

You will need:
  • Two Heads of Napa/Chinese Cabbage
  • 3 cups Coarse Sea Salt, preferably from Korea -- no joke
  • 30 cups of Water
What you will do:
  • Remove the outer 2-3 leaves from each cabbage, but don't discard!
  • Cut a 2" slit in the stem of each cabbage, carefully split heads of cabbage in half (easier than it sounds, I promise)
  • Salt each leaf of the cabbage, making sure to get plenty of salt on the thick, white parts and extra careful not to tear the leaves or disassemble the cabbage half.
  • In a deep, large container (such as the kitchen sink), dissolve 3 cups of Salt in 30 cups of Water.
  • Place each cabbage half, face-up into the water and cover with the reserved cabbage leaves.
  • Cover with plastic and use rocks, tin cans or a heavy lid to press the cabbage halves down into the water.
  • Soak for 8 hours. Flip and soak another 4 hours.
  • Check for bend-ability in the cabbage stems, when they are supple it's time to rinse (3 times), halve again (so you end up with 8 quarters of a whole cabbage) and drain (at least two hours, during which you should prepare the next step).
For greater details on soaking, check out this thorough post at Beyond Kimchee (my favorite Korean food blog!)

Part 2~MAKING THE RED PEPPER PASTE:
Photobucket
You will need:
  • A few handfuls of dried sea creatures (or one handful if you can't find multiple sea creatures or don't like sea creature flavored items - but one handful is a good idea)
  • 3 cups of Water
  • 2 Tbsp. Sweet, Glutenous Rice Flour
  • 1 Lg. Korean Radish, julienne into 1/8" matchsticks
  • 2 bunches of Green Onion
  • 4 cups of Korean Red Chili Flakes
  • 1/2 large Onion, roughly diced
  • 10 cloves Garlic
  • 2" piece of Ginger, roughly diced
  • 4 (or 2) Tbsp. Anchovy Sauce
  • 4 (or 2) Tbsp. Shrimp Sauce/Salted Shrimp
  • 1 1/2 Tbsp. Sugar
  • 2 Tbsp. toasted Sesame Seeds
What you will do:
  • Make a rice glue by boiling your handful of dried sea creatures in 3 cups of water, simmer for 10 minutes, remove from heat and let set, as is for 20 minutes. Strain off sea creatures and discard sea creatures, reserving 2 cups. Bring 1 1/2 cups of stock to boil while continuously whisking in the 2 Tbsp. of Glutenous Rice Flour until the mixture is bubbly and has thickened. Save the plain 1/2 cup stock for later.
  • In a blender or food processor, puree 1/2 large Onion, 10 cloves of Garlic, 2" piece of Ginger and reserved 1/2 cup Stock until smooth.
  • Pour 4 cups of Korean Red Chili Flakes into a large mixing bowl, add the onion mixture and cooled rice glue, anchovy sauce, salted shrimps, sugar and sesame seeds, mix.
  • Add the sliced Radish and diced Green Onions and let set for 30 minutes so the radish can extract some moisture and the mixture will be come more smooth and spreadable.
  • Taste test the sauce with a piece of cabbage to evaluate saltiness and flavor, adjust with additional fish sauce or stock for spread-ability as deemed necessary, then move on to assembly.
For greater details and more pictorial assistance, check out Cabbage Kimchee: Part Two from, yet again, Beyond Kimchee. 

Part 3~ASSEMBLY:
Photobucket
You will need:
  • Rubber Gloves
  • A Cookie Tray or Large, shallow dish
  • Airtight containers for storage
 What you will do:
  • Gently handle each cabbage quarter and use your gloved hands to spread red chili paste between each and every leaf. Roll up the quarter, place in an airtight container. Let the kimchi sit out on the counter 2-3 days for fermentation and moisture extraction before relocating it to the refridgerator.
  • Our Korean assistants explained that the outer leaves can be used to cover a bit of the kimchi, but that it is also generally spread with red pepper paste and then cut up and eaten that day as fresh kimchi with rice, which, by the way, is delicious!
For more details on this final part of preparing your kimchi, head over to Beyond Kimchee one more time!

In our house, we really love this fermented vegetable and have been beyond satisfied with the results of this recipe and process, slightly time consuming, but if you love fermentation, spicy foods, or kimchi itself, it's well worth it!

Monday, August 6, 2012

Crockpot Chicken Lentil Chili

When preparing to move to the other side of the world, there seems to be a steady realization that there are food items which have been begging to enter the home-dweller's bellies.

And so I found myself accessing my 99 or so Kindle cookbooks (all free downloads...don't worry) to find a way to use up some major lentils.

This Chicken and Lentil Chili was top notch!
Photobucket
Directions/Ingredients:
Original Recipe thanks to The Everything Healthy Cooking for Parties by Linda Larsen.

Combine 2 chopped Onions, 5 minced Cloves of Garlic and 2 chopped Carrots in the bottom of 4-5 qt. Slow Cooker. Sprinkle with a seasoning mix of 3 Tbsp. Chili Powder, 1/2 tsp. Cumin, 1 tsp. Basil, Salt and Pepper.

Top with 1 1/2 cups Dry Lentils, 1/2 cup Brown Rice and 1 lb. Chicken Breasts. Pour 3 cups Diced Tomatoes (fresh or canned) over all. In a small bowl, combine 1/2 cup Tomato Paste with 1 cup of the Chicken Stock; stir until tomato paste dissolves. Add to crockpot along with additional 3 cups Chicken Stock and 3 cups Water.

Cover and cook on low for 7-9 hours or until lentils and rice are tender and chicken is thoroughly cooked. Serve with sour cream (plain homemade yogurt) and salsa if desired.

Friday, August 3, 2012

Lasagna Soup

Inspired by the ease and success of a recent Tofu and Pork Skillet Lasagna, I opted to allow Pinterest to continue inspiring my kitchen creations and also to use up some lasagna noodles and complimentary ingredients I had at my finger tips.
Photobucket
As with the skillet lasagna, I opted to use tofu in this recipe simply because ricotta is difficult to track down in Korean markets and while I'm not opposed to either a) tracking it down nor b) making it from scratch, I'm equally satisfied with tofu as a substitute and since I was trying to put together a quick meal I figured the best bet was the ingredient which could be gathered from the small grocer at the bottom of the hill.

Directions/Ingredients:

Most of this is subject to change based on what's in the refrigerator and what your personal taste preferences are, that being said...

In a large pot, brown some ground or finely chopped pork (about 1 lb). Once browned, add a bit of olive oil if there is a lack of pork drippings and saute a chopped onion and bell pepper. As the onion and bell pepper begin to soften, add 2-3 minced garlic cloves shortly followed by about a cup of chopped mushrooms. Once this first set of ingredients is sufficiently sauteed and cooked add a jar and a half of pasta sauce and/or homemade tomato sauce (or tomatoes and tomato sauce would be a reasonable substitute about 4 cups total) and additional water or broth until ingredients are sufficiently covered and a bit of extra liquid remains. Bring to a boil.

Meanwhile, break apart 8 or so Lasagna noodles. Add noodles to boiling soup and let cook until al dente adding water or broth as necessary. While noodles are cooking, prepare one large package of tofu by draining off the water then crumbling as much or as little tofu as you like. Once noodles are cooked through add the tofu and cook for a couple of minutes until the entire dish is heated.

Serve with mozzarella cheese and crusty bread. Enjoy with the greatest of friends before enjoying some ruckus game-playing!

Wednesday, April 4, 2012

Home-made Yogurt Tips: South Korea

Photobucket

I've already explained a few things about making your own yogurt and I hope more and more people will attempt it because it incredibly easy and worth the small effort and hours of waiting, because waiting is not that painful. However, I wanted to take a moment to offer a few things I've learned about yogurt making, specific to South Korea.

First of all, my favorite way to prepare yogurt now is to use a stone pot (often used for dol-sot bibimbap, kimchi-chigae, etc.) I find these everywhere including the little markets near our home, I'm fairly certain I paid about 12,000 won for mine, so it's worth the investment and can safely be used on the stovetop. From there I just heat a full pot of milk to 110*F (43*C), you can get thermometers here from BakingSchool.co.kr or here from BeerSchool.co.kr

As for milk, I've had the best luck with Seoul Milk in the plastic container - I prefer higher fat content, but that's just preference. And, as for yogurt, I try to choose one that seems to be fresh and plain and have had decent luck, I recently used Yoplait and now just use my own yogurt to start the next batch, but Denmark Yogurt would also work out well.

Once you've heated the milk and added the yogurt to the stonept, simply remove the pot from the stovetop and wrap in a blanket (no need for heating pads or crockpots) and let it set 5-8 hours until it's set and the consistency you desire. No hassle, really. I bought a large glass jar from a Daiso for about 2,000 Won and happily fill it every week or so with fresh, plain, home-made yogurt!

Tuesday, March 20, 2012

Savory Pesto Rice Bowls

Photobucket
Earlier this month, I made a sweet little Breakfast Rice Bowl that was a perfect start to the morning.

Then I saw this post on Pinterest. Savory Oats. Hmmm.

Then, I had a batch of Walnut Basil Pesto in the fridge.

That's all it took.

At night, I'd wash my rice. In the morning, I threw it into the rice cooker with water, started it to go, took a shower. Stretched and did my hair.

Then fried an egg. Threw some rice in a bowl, topped it with Pesto, Mozzarella Cheese, a few Cherry Tomatoes and my fried egg - hearty, delicious and savory breakfast - no complaints!

Photobucket

Sunday, March 18, 2012

Quick Beer Brownies

Photobucket

The day after St. Patrick's day we had, sitting in our home, just over 1/2 cup of flat Home-brewed Porter from a friend. I had earlier seen a recipe for brownies using beer in place of water - using a brownie mix obviously. I had also recently seen a Korean brownie mix at my local mart and was itching to give it a shot.

I went down to the mart, paid my 3,000 won for a mix and headed back up the hill to work some translation magic. Without too much effort, I quickly realized these brownies were designed to be baked in a microwave (which is AWESOME for expats in Korea without an oven) But, I obviously wanted to use my oven, so I just assumed I'd put them in for the normal baking temp 350*F (177*C) and normal baking time 10 minutes.

So, a quick whisk of the mix and just over 1/2 cup of dark Porter I threw the brownies into the oven and soon had a warm rich brownies to share with our friend the home-brewer and...our own bellies...obviously!

Saturday, March 17, 2012

Menu: Roast Chicken and Pasta Salad

Photobucket
Photobucket

One of my favorite things to eat in South Korea is rotisserie chickens from the chicken truck. That's right, a truck (edit: many trucks), filled with a working rotisserie drive around and park throughout the city, offering freshly roasted chickens - better yet, you can get 3 small chickens for just 10$.

So the other night, the man went and got our three chickens which we ate with chopsticks while I boiled water and prepared some pasta. I then used the leftover dressing from this salad to dress the pasta, threw in some mushrooms and green onions and waited for the chickens to arrive.

Once the meal was finished, I set to work on making chicken broth in the slow-cooker.

Perfection!

Saturday, March 3, 2012

Roasted Pepper and Onion, Almond Pesto Pasta

This evening (that's right, this evening, as in, I'm posting a blog merely hours after having eaten the meal - I do believe that's a first) I went to work harvesting some fresh basil from my fabulous AeroGarden which was a Christmas gift from the man.

It's been a day of throwing fresh herbs into whatever I can, and I'm lovin' it! Hoping I can manage these greens well enough that they keep producing for me for a while at least.

Using this recipe from Menu Musings of a Modern American Mom, I created a dish that was truly satisfying and used up a number of ingredients I had on hand. I did, of course adjust the recipe to my availability of ingredients and personal tastes.

Here is what I came up with:Roasted Pepper and Onion, Almond Basil Pesto Pasta

Photobucket


Ingredients/Directions:

Bring a large pot of water to a boil. In a small skillet toast 4 whole cloves of Garlic in 1/3 cup room temperature extra virgin olive oil. As the garlic begin to toast, throw in 1/3 cup of Almonds and toast a couple minutes longer. Transfer ingredients from skillet into a food processor and pulse until a rough paste is formed (add additional EVOO throughout the process if necessary). Next, add 1/3 cup of cubed Parmesan to the food processor, pulse. Repeat that process with 1 cup of roasted peppers and onions then again with 1 cup of fresh basil. During this time, keep your eye on the water and add 1 lb. of Penne Pasta once the water begins to boil and cook until al dente. Reserve one cup of the pasta water (or you can have 1/2 cup heavy cream available) and drain the pasta. In the large pot, mix about 1/4 cup of the pasta water with 1/2 of the Pesto, continue adding pesto and a bit more water until you have the desired consistency in the sauce (not too runny, but not to stiff either), toss in the pasta, serve with additional Parmesan and basil with a fresh baguette and bottle of homemade wine, bon appetit!

Tuesday, January 10, 2012

No Bake Cookies

Photobucket
(Apologies for such a lame picture...I was so anxious to get these suckers made and devoured that I forgot to take a photo!)

In an attempt to further win over my winter camp students and increase my chances at an early release through subtle bribing, I whipped these no-bake cookies up which always impress my Korean co-workers and friends who are quite unfamiliar with the wide-world of baking and cookies.

Ingredients/Directions:

Bring to boil 1/2 cup of butter, 1/2 cup milk , 1 3/4 cups White Sugar, and 4 Tbsp. Cocoa in a sauce pan or pot.  Boil for about a minute, remove from heat and stir in 1/2 cup Peanut Butter followed by 1 tsp Vanilla and 3 cups Oats. Drop by spoonfuls onto cookie sheets (or cardboard covered w/ wax paper) and place in the fridge or on your Korean verandah in the winter and let set a couple of hours before serving!

Ddeokguk - Korean Rice Cake Soup

Photobucket
You can have a new year in Korea without having a bowl full of Ddoek-guk.  And when we opted to host a Redneck Life game night on the 2nd of January our friend Aaron and a Korean friend decided it was good and appropriate to bring us a bag of ddeok-guk-ddeok (the rice cake noodles specific to this soup - pictured top left and top center). So I did a bit of research and whipped up an incredibly large pot of ddeok-guk one week after the new year!

The original recipe calls for boiling beef in the first step but since I still have an abundance of freezer goods including shredded pork, I went that route.

Ingredients/Directions:

In a large pot bring to boil 1/2 onion, 3 scallions and 8 smashed garlic cloves with 10 cups water (or mix of water and choice of broth).  Reduce heat and simmer (1 hour if you added beef, 20-30 minutes if you're using freezer pork).  Meanwhile, soak ddeok, Korean rice cake, in a bowl of cold water about 20-30 minutes.  Mix 1/2 lb. cooked meat with 2 minced cloves of garlic, a touch of sesame oil, salt and pepper (can be used as topping or thrown into broth after the next step). Strain onion, scallions and garlic from broth pot. Drain ddeok of cold water. Add deok and meat to the boiling broth, let boil for 8-10 minutes until ddeok is soft and chewy. Whisk 2-3 eggs, drizzle into soup, let set about one minute before stirring. Serve soup with crushed seaweed on top and welcome in the New Year!

Tuesday, November 1, 2011

Korean Spiced Pear Cider

Photobucket

Last year we welcomed in fall with this Apple Cider Taste Alike.

This year, I did more or less the same thing...but with Pear Juice. 
1 Part Pear Juice
1 Part 수정과 (soo-jeon-ggwa)
1-2 Sticks of Cinnamon
Sprinkle of Cloves (5-6)
Sliced oranges or orange peels

Heat in slow-cooker or on the stove-top.  You'll convince people you're a domestic goddess because cider simply smells amazing and brings people 'home'...So they'll love you.  And that's the Harrington secret to making friends and ensuring they stick around ;)

Wednesday, October 19, 2011

Kimbap in a Pinch

Photobucket

Kimbap is Korea's version of a sushi roll...but not really because Korea is not Japan and sushi is Japanese. So kimbap is a Korean snack/quick dish of rice and things wrapped in seaweed. Typical Korean Kimbap includes ham, egg, pickled radish and other non-Japanese style additions. It's cheap and perfect for so many situations.

Once, in desperate need of a quick dinner, a Korean friend recommended a twist on traditional kimbap...I'm calling it Kimbap in a Pinch.

Like all foods I truly, truly love, this can be adjusted and played with to create some great fusion style eats....here's the basic and a couple of variations I've had some success with ^.^

Prepare rice. White rice. (One cup of un-prepared rice will be enough for about 4 rolls once it's been properly prepared).

Mix in mayonnaise, a touch of sesame oil, drained tuna fish, a veggie of choice (I used bell peppers), and some sesame seeds.

Spread onto a sheet of seaweed ('kim' in Korea, 'nori' elsewhere).

Roll, cut, eat.

Variations~Mix-In:
  • Mayonnaise, chopped tomato, chopped bacon, salt and pepper (B.S.T. - Bacon, seaweed and tomato) Quite amazing, trust me.
  • Pesto and chopped tomato -- received the most raves at a recent gathering
  • Mayonnaise or a touch of salsa/hot sauce, black beans, corn and tomatoes -- haven't tried this, could be a total fail.
  • Hard-boiled and chopped egg, mayonnaise, salt and pepper (think egg salad in a sheet of seaweed) -- also, haven't tried but definitely think there's potential!
  • Whatever you can think of! Kimbap is the new sandwich my friends, go out, experiment and have a grand ole time.

Udon with 'Poached' Egg and Veggies

Photobucket

This was uh-mazing. And easy.
Pinterest Inspired.
Original Recipe here - from the Kitchn

Ingredients/Directions:

2 cups of water per Udon Noodle package -- if you're using the one such as that pictured in the bottom right of the above collage. Bring water to a boil then add Udon Noodles, cook 3-4 minutes or until near done. Throw in chopped cabbage, cover with a lid and let cabbage cook/steam for 1-2 minutes.  Mix in sauce packets from Udon Noodle package (soy and such) then carefully put a raw egg (in this case 2) into the boiling water, let it cook until set, dish into bowls, sprinkle on some green onion and enjoy!

Monday, October 17, 2011

Unstuffed Pepper Soup

Photobucket


I quite enjoy stuffed peppers, however I tend to be impatient and too much of a procrastinator to actually make them happen.  Not to mention, I really have a thing for soups. I don't remember any quantities or anything of an exact nature in regards to this dish, but this blog is primarily for personal records and as a source of inspiration to those folks who find a random assortment of whatnot waiting in their fridge...

You may remember when I took a day to prepare some foods once-a-month-style so that doubling up on my Master's wouldn't be deadly? Well, I used one cup of that Tomato Sauce in addition to home-made chicken broth and a cup of Cold Chaser Tea to provide the base for this dish. That of course was after sauteing Onion, Bell Pepper, Jalapeno and Garlic in a touch of olive oil. I also had some corn lying around, so threw that in the pot and soaked up all the excess liquid by throwing in some rice I cooked up quickly in the rice cooker. Season with salt and pepper, serve with cheese and sour cream if you're so lucky and enjoy as part of a Monday night dinner with a good friend and someone you love - they'll probably devour it all ^.^

Pesto Egg Baguettes

Photobucket
At Costco recently, I just so happened across LaBrea Demi-Baguettes, which I had learned, from my dear friend Holly, are an item to be treasured.  So, at just under 7,000 won, I picked up a bag of 6 and got to brainstorming the best uses for these delectable little morsels.  With brainstorming came images once gathered on Pinterest and before you could spell LaBrea Demi-Baguettes in Hanguel (the Korean alphabet), I had these Pesto Egg Baguettes in the oven!

Ingredients/Directions:

Slice the top third or so off of a demi-baguette, scoop out the innards from the bottom 2/3's of the bread and munch on this while completeing the other tasks...Spread some prepared Pesto into the hollowed out bread (you could also use rolls or bowls), sprinkle a bit of Mozzarella cheese in side and top with a raw egg.  Place baguette boats into an oven of 350 and bake for approximately 20 minutes until the egg white has set. Last 5 minutes sprinkle on some more Mozzarella if you enjoy cheese, remove from oven, pour a glass of wine and enjoy my friend!

Thursday, October 6, 2011

Shredded Chicken: For a Month-ish

Photobucket

I'm quite certain this bit of chicken isn't meant to last a month because I opted for the slow-cooker once again. However, should I do this one or two more times I will in fact have plenty of chicken and chicken broth for the month!

The chicken entered the slow-cooker with a sprinkling of salt and pepper a touch of water for the pot and a few squeezes of lemon juice. At the end of the day, the chicken meat was eager to come of the bones and be shredded and store in the freezer, 1 cup at a time. Next day, the chicken bones happily entered the slow-cooker with a quartered carrot and onion and a bay leaf simply to be covered in water and made into a fabulous broth.

I love the slow-cooker. That's all.

Roasted Veggies: For a Month

Photobucket

Roasted Veggies don't require much explanation. Rachel Ray roasts up some assorted bell peppers and onions followed by (or preceded by, doesn't matter much) a couple of cubed Butternut Squash.

I also roasted peppers and onions. However, I opted for small Korean pumpkins rather than Butternut Squash and rather than cube and roast, I simply set the beasts in the crock-pot (it's best to scoop out their innards first, but it can be done either way), turned it on for 6-8 hours on low and froze smashed pumpkin rather than cubed and roasted. I looked through the recipes which call for the cubes and decided a pure would work as well, differently, but it would still work. Also, I highly recommend cooking pumpkin in your slow-cooker, it's so incredibly easy, too easy really.

Rice Pilaf: For a Month


Photobucket

Rachel Ray cooks her rice in the traditional, stove-top manner. Personally, I opted to throw the rice in the rice-cooker, saute up the onions and such in a pot then add the finished rice when it was ready - so much easier (in my opinion).

Ingredients/Directions:

In a rice cooker prepare 3 1/4 cups Rice (Rachel Ray recommend long-grain ... I used whatever it was Korea could give me), this should require 2 1/4 cups water and another 2 1/4 cups chicken broth. Just before rice finishes heat 3 Tbsp. of Olive Oil then add 3 chopped Onions and salt and pepper to taste, saute 8-10 minutes. When onions are translucent, scoop rice into the pot mix and add in your choice of 16 oz. Frozen Peas, Corn, or Toasted Almonds (I went with Almonds, they're the most available) Freeze in 1 cup increments.

Tomato Sauce: For a Month

Photobucket

Here we are with another mega-load of cooking. This recipe yielded 15 cups of tomato sauce that I'm excited to use for dishes such as Spanish Rice with Shrimp, Fusilli with Chicken and Tomato Sauce and home-made Calzones. Now, doing this in Korea posed a couple of challenges. First of all, I'm not sure if anchovies exist but I went a head and purchased some canned fish with fingers crossed it'd be similar to anchovies...pretty sure it wasn't. BUT, of course I used it anyway, because that is simply how I roll in my kitchen.  Anchovies (or other canned fish) are ultimately optional, if I do this dish again, I'll probably opt out.  The other challenge, in my kitchen anyhow, was opening the giant can of whole tomatoes. I always knew our can opener wasn't top notch but seriously, things got ugly and after about 30 minutes and a new can opener, I finally got the stupid can open. I can't imagine you'll have to face that challenge.

Ingredients/Directions:

In a 5-6 qt. heavy dutch oven combine 1/4 cup Olive Oil, 8 smashed cloves of garlic, 6 oil-packed Anchovy Fillets chopped and 1/4 tsp. Crushed Red Pepper. Cook over medium heat until garlic is golden and anchovies disintegrate (3-4 minutes).  Pour in 1 cup of red wine and 4 cans (28 oz) of crushed tomatoes (I had the luxury of using canned whole tomatoes in a 2 lb. can which then had to be 'crushed' with my handy-dandy immersion blender...so just use a lot of tomatoes).  Bring to a boil and let boil about 10 minutes before reducing heat. Cover part-way and simmer until the sauce is thick (about 2 hours) Stir occasionally. Season with salt. Cool and store in 1 or 2 cup portions in Ziploc baggies in the freezer!

Tuesday, October 4, 2011

Jap-chae: Korean Stir-fried Noodles and Veggies

Photobucket


All you really need to know about Korean cooking can be learned from one woman...that is Maangchi. She is my number one go-to regarding Korean foods since she is a) Korean, b) quarky and c) speaks English. Additionally, she not only posts recipes for dishes with lots of pictures, but almost always includes a video, which is just nice...perhaps someday I'll go live on YouTube with my cooking skills! (HA!)

One of my all-time-favorite Korean dishes is Japchae. The dish is made with sweet potato (also called starch or glass noodles), a ton of veggies and a simple sauce of soy sauce and sesame seeds.

There's a ton of veggies in this dish and the meat called for can easily be substituted or simply left out for a more vegetarian friendly option.

I realize the polite thing to do would be to re-iterate the recipe here, but I really, REALLY want you to meet Maangchi, because she's a blast, so here's the japchae recipe and a bit of Maangchi herself!
Related Posts Plugin for WordPress, Blogger...