Showing posts with label Cookbook. Show all posts

Sunday, January 20, 2013

Blackberry Coffee Cake

Extended Shelf Life for: Blackberries
Photobucket
 We're still flying high on the recent salvaging of blackberries and every time I pull out a bag from the freezer, my heart rejoices and my taste buds wait in anticipation.

While I love berry dishes and cooking berry filled pies, cobblers or smoothies, we don't often spend money on fresh berries...because, well, we don't often spend money on any fresh produce :)

But berries only come around so often and when they do, it truly is a treat, so waking up a few mornings to enjoy this Blackberry Coffee Cake has definitely put me on cloud nine!

Ingredients/Directions:
From Better Homes and Gardens Cookbook

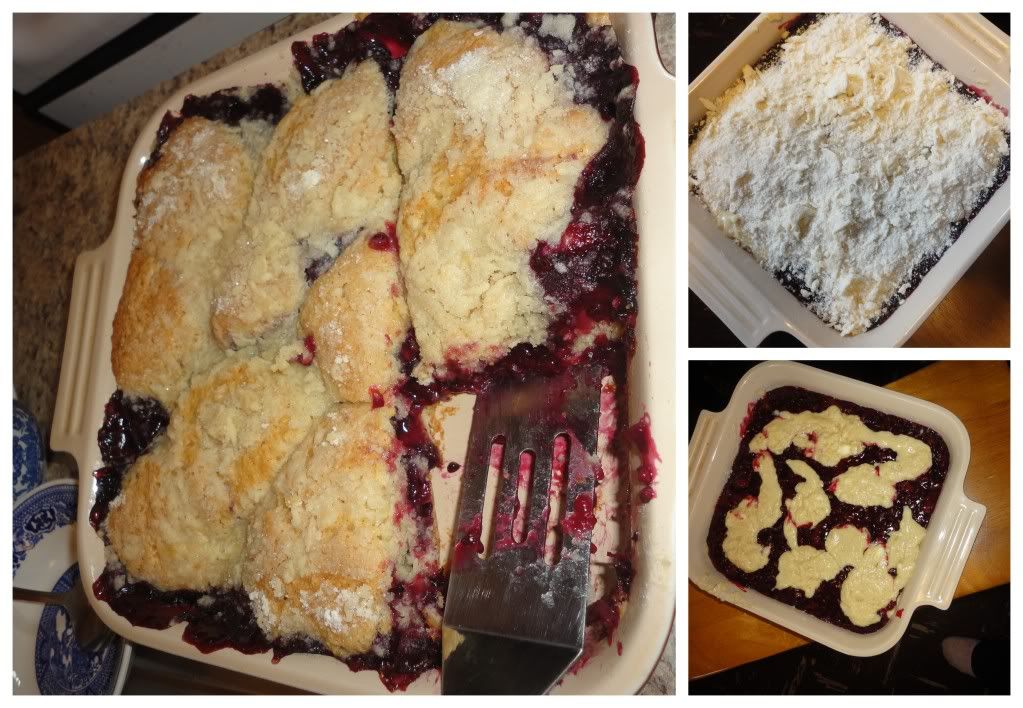
In a medium saucepan combine 1 1/2-2 cups fresh or frozen Blackberries and 1/4 cup Water. Bring to a boil, reduce heat and simmer about 5 minutes until fruit is tender. Combine 1/4 cup Sugar and 2 Tbsp. Cornstarch and stir into fruit. Cook and stir over medium heat until mixture is thickened and bubbly. Cook and stir an additional 2 minutes, then set aside.

Preheat oven to 350 F. In a medium bowl combine 1 1/2 cups flour, 3/4 cups Sugar, 1/2 tsp. Baking Powder and 1/4 tsp. Baking Soda. Cut in 1/4 cup Butter until mixture is coarse. Make a well in the center, set aside.

In a small bowl combine 1 beaten Egg, 1/2 cup Buttermilk and 1/2 tsp. Vanilla. Add this mixture, all at once, to the flour mixture. Stir until just moistened, batter should be lumpy.

Spread half of the batter in an un-greased square baking pan. Spread fruit filling on top and drop remaining batter in small mounds on top of fruit filling.

In another small bowl, stir together 1/4 cup Flour and 1/4 Cup Sugar. Cut in 2 Tbsp. Butter until misture is coarse, sprinkle over coffee cake.

Bake for 40-45 minutes until golden. Cool slightly, serve warm.

Wednesday, January 9, 2013

Banana Sandwich Loaf: for the Bread Machine

Extended Shelf Life for: Bananas

I don't know if you were able to make necessary assumptions, however we had a recent influx of bananas and after I preserved them every way I know how and took a chance on Banana Vinegar, I still had a few 'fresh' ones to use and opted to break out the ole bread maker and do a fine yeast bread.

Before I dish out the recipe, let me tell you that if you own and use a bread machine, you should get your hands on the cookbook: The Bread Lover's Bread Machine Cookbook. Seriously, if you've struggled with baking bread in a bread machine (especially at high altitude) this book will revolutionize your world and make bread machine baking a breeze! It's probably fantastic even if you're not at high altitude...yep, I'm sure it is actually.

Anyway, here is a recipe I made recently from this book (without any high altitude adjustments, however, if you go here, you'll find some helpful tips for high altitude), and it was a winner, especially with my recent Crockpot Apple Butter -- oh the joys of home-made things!
Photobucket
Ingredients/Directions:

Place the following ingredients into  the bread pan according to manufacturer's directions (mine requires all the wet ingredients to go in first, followed by dry).

1 cup water, 1 Tbsp. Vegetable Oil, 1 ripe Banana (cut into chunks), 3 cups Bread Flour (or all-purpose flour), 1/4 cup dry Buttermilk Powder (or plain milk powder), 1 Tbsp. Vital Wheat Gluten, 1 1/2 tsp. Salt, 2 tsp. Yeast. Set crust to medium and begin Basic Cycle. When cycle is finished, remove from pan, cool and slice! (This is for the 1 1/2-lb. Loaf).

Wednesday, December 26, 2012

Pizza Experiment #2: Super Meat and Supreme

Not so much a recipe for extending any shelf life, this is a part of my master-mind plan to develop and master some pizza goodness....because, who doesn't love a good homemade pizza...and because, I just might need to know a solid thing or two about pizzas in the upcoming months ;)

So, after Christmas with family and gifts which would encourage this endeavor, such as a pizza stone and a new cookbook, I was ready to hit the ground running and kick pizza experimentation into full gear. With all the time and inspiration in the world, I prepared a couple of pizzas post-Christmas while the family played games and read new books, there couldn't have been a more peaceful home while dinner preparations were in the works and it's unlikely there could have been a more delighted group of folks once the pizza was prepared.

Photobucket

Pizza Crust
Ingredients/Directions:
From the Cookbook: 500 Pizzas & Flatbreads

Classified as 'basic neapolitan pizza crust', this recipe will give you enough for two 12-inch pizzas.

Begin by sprinkling 1 tsp. Active Yeast over 1 1/4 cup Warm Water. If you have a standing mixer, use the bowl for that otherwise you'll be doing it by hand in a large mixing bowl. Let water and yeast set for 5 minutes.

Add 1 tsp. Salt, then mix in a total of 3 cups of Flour, one cup at a time (it's recommended to use 2 cups bread flour and 1 cup all-purpose flour, I however, only used the latter). Kneed or mix with a dough hook once it begins to form, for about 5 minutes until the dough is smooth and elastic.

Divide dough in half and place in separate, lighly oiled bowls. Roll dough around so as to transfer a bit of oil onto the dough ball itself.

Cover bowls with flour cloth or paper towels and allow to rise for 2-3 hours until dough has doubled in size. 

When the rest of your pizza is ready to assemble, simply roll out dough, using additional flour as needed and prepare for your pizza-eating pleasure!
Photobucket

Pizza Sauce
Ingredients/Directions:
From the Cookbook: 500 Pizzas and Flatbreads

So simple, so delicious.

Heat 3 Tbsp. Olive Oil in a large, heavy frying pan, add 1 minced Garlic clove and cook 1-2 minutes. Add one 28-oz. can of Whole Tomatoes, breaking them down with a wooden spoon. Simmer for 15-20 minutes until sauce has thickened and liquid has evaporated. Season with salt, oregano, red pepper flakes and other seasonings of choice.
Photobucket

Pizza Toppings
Not rocket science...

For these experiments I prepared one pizza using the following ingredients after spooning on some sauce:

Pepperoni, Sliced Summer Sausage, Canadian Bacon, Sauteed Mushrooms and Caramelized Onions

The other pizza was similar yet different and was topped, after spooning on sauce, with:

Pepperoni, Canadian Bacon, Fresh Onions, Olives

Both were delicious and well received...what more could you ask for?

Friday, November 30, 2012

One Pot Spaghetti

Extended Shelf Life for: Mushrooms, Onion, Green Pepper, Jalapeno and Tomato
Photobucket
Confession: This was not our favorite dish. BUT, I'm 99.99% certain that's because I used an un-seasoned cast iron kettle which may not have had the best reaction to tomato sauce...and because we use dumpster food. I'm quite confident, that the recipe, as printed in Better Homes and Gardens would be absolutely delicious, because as of now, that singular cookbook has only failed me when I've failed it...which leaves the blame on only one of us...and it's not the cookbook.

So, if you've got a well seasoned pot, more experience with cast-iron or planning to use a stainless steel pot, this recipe is definitely for you!

Ingredients/Directions:

In a large pot saute 1-2 cups sliced Mushrooms, 1 diced Onion, 1 diced Bell Pepper, 1 diced Jalapeno and 1 minced clove of Garlic until tender, season with salt and pepper.

Stir in 1 diced tomato, 2 cups of Chicken (or Turkey or any other) Broth, 1 3/4 cups Water, 6 oz. of Tomato Paste and Italian Seasoning. Bring to a boil before adding 6 oz. of dried, broken Spaghetti Noodles.

Return to boiling, reduce heat and simmer, uncovered for 15-20 minutes until spaghetti is desired tenderness and sauce is desired consistency.

Enjoy!

Wednesday, October 3, 2012

Roasted Roots and Chimichurri

Extended Shelf Life for: Roots and Parsley
Photobucket
Roasted veggies are roasted veggies and honestly, I have no secrets...I could use some tips actually on how to get the perfect roasted veggies without waiting an hour and a half, but perhaps the answer to that lies more in leaving high elevation than anything else...or having a more efficient oven, who knows...

What I can offer however, is a recipe for Chimichurri - a sauce which I have dreamt about and considered for years, every time we receive an abundance of parsley, I think, hmmm, I should really try that recipe for Chimichurri sauce. Well folks, I finally have and let me tell you, totally worth it and honestly, should have been done a long time ago!

Ingredients/Directions:

In a food processor, blender or your awesome multipurpose juicer combine 1 1/4 cups Italian Parsley, 1/4 cup Olive Oil, 2 Tbsp. Fresh Oregano or Basil, 2 Tbsp. Onion, 3-4 peeled Garlic Cloves, 2 Tbsp. Apple Cider Vinegar (or Red Wine Vinegar), and 1 Tbsp. Lemon Juice - pulse in food processor or blender, or run through juicer until you reach a nice, saucy consistency. Cover and chill a minimum of 2 hours before serving, should last up to 1 week or a little more if you 'daring'!

Wednesday, September 19, 2012

Egyptian M'saa'a

Extended Shelf Life: Eggplant, Pepper, Tomatoes

Photobucket
My first experiences with eggplants came by way of salvaged eggplants. Since those first moments with the spongy, purple veg I've come to love experimenting and playing with eggplant. Searching through my Kindle brought to the surface this delicious eggplant casserole, it is absolutely fantastic and highly recommended!

Ingreidents/Directions:
Inspired by: Nile Style: Egyptian Style Cuisine and Culture by Amy Riolo

Preheat oven to 350 degrees F.

 Heat 1 Tbsp. Vegetable Oil in a large saucepan over medium heat. Saute 1 small Onion until translucent, 3-5 minutes. Add 1 diced Anaheim Pepper and 6 cloves minced Garlic and cook until golden and aromatic. Add 3 cups Tomatoes, 1 tsp. ground Coriander, 1 tsp. ground Cumin and salt and pepper to taste. Bring tomato mixture to a boil, cover and reduce heat, simmer for 20 minutes or until thickened.

While the tomato sauce thickens, prepare the eggplant in a large wide skillet with one inch of vegetable oil over medium-high heat. When oil is hot (a drop of water sizzles when flicked into the oil is one way to test the readiness), add the eggplant slices and fry on both sides, about five minutes, until golden and soft. Drain cooked eggplants on a wire rack or plate covered with paper towels.

Once all pieces are ready, it's time to assemble the Ma'saa'a/Lasagna/Casserole. In a 9 inch cake pan, oval casserole dish or square casserole dish simply layer ingredients starting with eggplant, followed by sauce and cheese until all the ingredients are used and the dish is full. Bake uncovered for 20-30 minutes until cheese and sauce bubbles and a crust begins to form around the edges.

Enjoy with rice or crusty bread!

For more on Eggplants and other recipe inspiration check out my more detailed and interactive Squidoo Lens: The Art of Salvaging {Eggplant}

Thursday, August 23, 2012

Easy Peanut Butter Cookies


Photobucket
When you realize you have entirely too much peanut butter the week before moving across the world and have absolutely zero desire to purchase flour at the mart at the bottom of the hill, you give a few shouts of praise when you run across this recipe in Mary Brown's Grandma's Favorites - Over 30 Tasty Time-Honored Cookie Recipes that is a combination of 3 simple ingredients and will undoubtedly be a hit amongst friends.

Friends, you've never met an easier cookie recipe.

Described as a recipe developed out of necessity when times got hard, these are an absolutely fantastic option when funds are tight or your too lazy to go out for additional ingredients.

Directions/Ingredients:

Preheat oven to 350 F. In a large mixing bowl mix together 1 cup of quality Peanut Butter, 1 cup of Sugar and 1 Egg. Form dough into small balls, placed on an ungreased cookie sheet and use a fork to create the criss-cross marks essential to peanut butter cookies. Bake for 8-10 minutes until edges turn brown. Cool and enjoy the goodness of simple yet incredibly delicious peanut butter cookie!

If you're wanting to change things up, try a different nut butter!

Monday, August 6, 2012

Crockpot Chicken Lentil Chili

When preparing to move to the other side of the world, there seems to be a steady realization that there are food items which have been begging to enter the home-dweller's bellies.

And so I found myself accessing my 99 or so Kindle cookbooks (all free downloads...don't worry) to find a way to use up some major lentils.

This Chicken and Lentil Chili was top notch!
Photobucket
Directions/Ingredients:
Original Recipe thanks to The Everything Healthy Cooking for Parties by Linda Larsen.

Combine 2 chopped Onions, 5 minced Cloves of Garlic and 2 chopped Carrots in the bottom of 4-5 qt. Slow Cooker. Sprinkle with a seasoning mix of 3 Tbsp. Chili Powder, 1/2 tsp. Cumin, 1 tsp. Basil, Salt and Pepper.

Top with 1 1/2 cups Dry Lentils, 1/2 cup Brown Rice and 1 lb. Chicken Breasts. Pour 3 cups Diced Tomatoes (fresh or canned) over all. In a small bowl, combine 1/2 cup Tomato Paste with 1 cup of the Chicken Stock; stir until tomato paste dissolves. Add to crockpot along with additional 3 cups Chicken Stock and 3 cups Water.

Cover and cook on low for 7-9 hours or until lentils and rice are tender and chicken is thoroughly cooked. Serve with sour cream (plain homemade yogurt) and salsa if desired.

Monday, July 2, 2012

Black-Eyed Pea Salad


Photobucket
I've always appreciated a hearty salad in the summer, but living in South Korea, I NEED a hearty salad in the summer. I need salad because it's not a hot meal nor a heavy meal and it fits summer perfectly. This Black-Eyed Pea Salad was delicious on it's own and absolutely fantastic served over/mixed with some brown rice.

Ingredients/Directions:

Prepare 1 lb. of dried black-eyed peas (I soak my beans over night in the slow-cooker, rinse in the morning, cover with water and cook on low all day, 8-10 hours). Drain and Rinse. In a small sauce pan heat up 1/4 cup Sugar, 1/4 cup Olive Oil, 1/4 cup Balsamic Vinegar, 1 clove of Garlic, minced and a shake of Black Pepper, heat until sugar has melted. Cool this dressing to room temperature. Meanwhile, combine the black-eyed peas with 2 Bell Peppers (Red and Yellow will yeild the most appealing salad), 1 Onion (again, red is preferred) and 1/2 cup chopped Celery if available.  Toss with dressing and chill salad before serving!


Friday, May 11, 2012

Lentils and Yogurt Sauce


Photobucket
Unfortunately, I wasn't all to impressed with my lentils from this meal, so I'll just say, find yourself a decent lentil or dall recipe and then get to work on this Yogurt Sauce - serve them up together and enjoy! The yogurt sauce (Tzatziki/Tsatsiki) is quite divine!

Ingredients/Directions:

Peel, seed and chop one large cucumber (preferably English), sprinkle with salt and let drain in a large colander for about an hour. Using 1 1/4 cups of Greek or Strained yogurt add 2 Tbsp. Olive Oil, 1 Tbsp. fresh Lemon Juice, black pepper and 2-4 cloves of minced Garlic. Mix well, cover and refrigerate until serving. Before serving, squeeze remaining moisture from cucumbers, add to the yogurt along with freshly torn mint and parsley, mix well to combine. Enjoy on lentils, crackers, pitas, etc.

Thursday, May 10, 2012

Lemon Almond Pie with White Chocolate Drizzle

First of all, if I were a fruit, I'd like to a lemon. They are gorgeous and bright and beautiful and full of all things joyful, just look at them!
Photobucket
Photobucket
Second of all, I'm still going strong with my pie making-skills and am looking forward to one day doing so with actual pie plates as opposed to round cake pans - all in good time.

For now, directions and ingredients for a deliciously tart and sweet pie!

Ingredients/Directions:
From The Everything Potluck Cookbook by Linda Larsen

Preheat oven to 400 F. In a small bowl combine 1/2 cup chopped almonds, 2 Tbsp. Brown Sugar and 1 Tbsp. Soft Butter, mix well and press into the bottom of one pierced pie crust. Bake for 5 minutes and cool on wire wrack. Meanwhile, in a large bowl combine 1 cup Sugar, 2 Tbsp. soft Butter. Stir in 3 egg yolks and beat well. Add 2 Tbsp. Flour and a Pinch of Salt, mix again. Stir in 1 cup Milk, 1/2 cup Lemon Juice and 2 tsps. Lemon Zest. In a seperate bowl, beat 3 egg whites until stiff peaks form, fold into egg yolk mixture and spoon into prepared pie shell. Bake for 10 minutes then reduce temperature to 325 F and bake 30-40 minutes until top is a deep golden brown. Cool on a wire rack. On the stovetop, prepare white chocolate drizzle by melting together 1 cup White Chocolate Chips, 3 Tbsp. Heavy Cream and 2 tsps. Corn Syrup. Drizzle over pie, let cool completely and store in the refridgerator. Absolutely DELICIOUS!

Saturday, May 5, 2012

Cowboy Cornbread (Mix)

Photobucket

For the same picnic mentioned previously, I decided to whip up some cornbread.

Using the recipe from the Gooseberry Patch's Chili Cookbook.

Ingredients/Directions:

Mix together 1 cup Yellow Cornmeal, 1 cup Flour, 1/4 cup Sugar, 1 Tbsp. Baking Powder, 1 tsp. Baking Soda and 1/8 tsp. Salt. If you want to give this as a gift of save it for another day simply pour into a jar or Ziploc and save for later. Other wise, place these dry ingredients into a large bowl. Separately, whisk together 3 Tbsp. melted, cooled butter and add 1 1/3 cups buttermilk (I did 1 cup milk + 1/3 cup Yogurt), add one egg and mix thoroughly. Pour the wet mixture into the dry and stir until just combined. (If you're feeling funky throw in a few handful so corn kernels before baking). Pour into a square or round pan, bake at 425*F (218*C) for 30 minutes.

Tuesday, April 24, 2012

Crustless Spinach Tomato Quiche

I have currently set a goal to master pastry crusts, however, I had not set that goal, nor did I have sufficient time the night I opted to throw together this crust-less quiche. 

Served to new friends before splitting off into our respective genders for basketball and cafe chatting, this was a delightful light dinner on a school night.

Ingredients/Directions:

In a large skillet, saute half an Onion and a couple cloves of minced Garlic, add a couple of handfuls or roughly 2 cups of fresh, chopped Spinach. Once Spinach is wilted, throw into the bottom of a well greased round cake pan. Top with slices of tomato and a sprinkle on some mozzarella cheese. In a separate bowl, whisk together 6 eggs with 1/4 cup milk or yogurt, season with salt and pepper, pour over Spinach. Top with grated Parmesan and bake at 350F (177C) for 20-30 minutes or until egg mixture is set and top is beginning to brown.

Saturday, April 21, 2012

Taco Soup

Photobucket

This soup received rave reviews. Actually, I keep forgetting to post the recipe, but one friend has reminded me via Facebook that she would like to make this recipe, or rather she'd like her husband to make this recipe, so I suppose I should get to posting the recipe ^^

Unfortunately, for those living in South Korea, all of the ingredients aren't that easy to come by such as ranch dressing packets or Mexican chili powder. However, I think the ranch seasoning can be left out and perhaps you can replace the Mexican chili powder with Korean chili powder or take a look at some of Korea's online grocery stores.

Anyway, on to the recipe.
Photobucket

Ingredients/Directions:
Adapted from the Fix-it and Forge-it-Cookbook

I use a slow-cooker otherwise called a crock-pot which we purchased at Costco to prepare this soup, however it can easily be made in a large pot on the stove and should take significantly less time. It is ready to eat when it's been thoroughly heated.

Into a large crockpot mix together 2 cups prepared Black Beans, 2 cups diced tomatoes (either canned or fresh - if you use fresh you may need to add water or chicken broth to the soup for the purpose of consistency), 1 diced Onion, 3-5 roasted and chopped Green Chilies, 1 can of Tomato Sauce, 1 can of Corn. Season the soup with 3-4 Tbsp. Mexican Chili Powder, 1/2 or whole package of dry Ranch Dressing seaoning (depending on what other uses you have for it/how difficult it is to get where you are currently located ^.~), a shake of Cumin, Cayenne Pepper (Tobasco Sauce would also work) Salt, Pepper, and 2-3 minced cloves of Garlic. Stir and add any liquid if necessary. Turn the slow-cooker to low and cook for 6-8 hours or heat on the stove-top for an hour or so. Serve with Cheese and Tortilla Chips!

Banana Nut Rice Porridge

Photobucket
Breakfast is big deal in our home. So is using up whatever random ingredients may be living in our refrigerator and may potentially need to be getting on out of there quickly. Needing to be booted from the fridge this weekend was some rice from a recent dinner of Kimchi Chigae.

If you've scrolled through any of my more recent posts, you may notice I have a slight obsession with Rice Pudding. So, when I was reading through a cookbook on my Kindle and noticed a Rice Cereal/Rice Porridge, I knew I was in for some recipe inspiration!

Saturday morning in Daejeon, South Korea was as rainy as could possibly be making for the perfect opportunity and weather to enjoy a hot bowl of porridge. Throw in some banana and walnut and you're nearing on tastebud ecstasy!
Photobucket
Ingredients/Directions:
Adapted from eBook Superfoods: Simple Breakfast Recipes

In a small sauce pan heat 2 cups prepared rice (brown is recommended, but white will serve the same purpose however less nutritionally) and 2 cups of milk. Boil this mixture until it begins to thicken, stirring occassionally (about 5 minutes). Reduce heat to medium and add 1/3 cup Sugar and 1/2 tsp. Grated Orange Peel, cook an additional 5 minutes until flavors blend and porridge thickens a bit more. Remove pan from heat and add 2 tsp. Vanilla Extract and the following spices to taste/per preference: Cinnamon, Cloves, and Allspice (Personally, I go heavier on the cinnamon and light on the cloves and allspice). Serve porridge into bowls, top with one sliced Banana per serving and a handful of crushed Walnuts, an extra shake of cinnamon and enjoy with your breakfast drink of choice!

Photobucket
 
Find more sweets for your weekends and day-to-day...
 

Sunday, April 8, 2012

Orange Curd

Photobucket
I've been spending more time reading cookbooks from my Kindle, just to garner inspiration. In a cookbook entitled Love of Cooking: Salads by Maggie Brooks I spotted a recipe for Lemon Curd. The author then states that Lime can easily replace the lemons in the recipe...I however was lacking both Lemons and Limes and was rather fortunate to have had some oranges recently gifted to me. I decided that Lemons, Limes and Oranges share enough properties (pulp, zestable, citrus) that oranges could also be substituted in this recipe. Friends, oranges are a good and beautiful substitution in a Lemon Curd recipe.

Ingredients/Directions:

In a small sauce pan heat 1 cup Sugar with 1 Tbsp Orange Peel, grated and 1 cup Fresh Orange Juice. Whisk well. Once heated, add 3 Tbsp. Butter and 3 Lg. Eggs, slightly beaten. Stir constantly until the mixture is thickened and coats the back of a spoon - about 8 minutes. Pour into glass jar or other container with cover and chill. Can be stored in the fridge for up to 2 months.

I recommend grating all of the orange peel and allowing the surplus to air dry to be used in future dishes.

We enjoyed this curd on top of some home-made Beer Bread.

For more sweet treats, check out, Sweet as Sugar Cookies....


Sunday, March 25, 2012

Gypsy Soda Bread

Photobucket
Wanting to ensure we would have breakfast to look forward to on Monday and for a last chance using up some sour-home-made-yogurt-that-was-kind-of-like-buttermilk I hit my Kindle collection of cookbooks and searched for 'buttermilk'.  Many things turned up, but the one that sounded quickest and easiest was a Soda Bread from a cookbook about Gypsy Cuisine (although, if you read the Amazon reviews some folks don't agree about the authenticity of the recipes - I know nothing about traditional or non-traditional Gypsy Cuisine...but am still calling this Gypsy Soda Bread, sorry if you find such offensive)

Ingredients/Directions:
From Gypsy Feast: Recipes and Culinary Traditions of the Romany People by Carol Wilson

Preheat oven to 400*F (204*C). In a large bowl mix 2 cups Flour, 1 tsp. Baking Soda, 1 tsp. Salt and 1/2 tsp. Cream of Tartar. Rub or cut in 2 Tbsp. Butter until well dispersed. Make a well in the center and pour in 1/2 cup Buttermilk, mix quickly until a dough is formed. Knead lightly on a floured surface and roll into a round about 1 1/2 inches thick. Mark the top with four cuts. Bake on a lightly greased baking sheet for 20 minutes, until golden and sounding hollow when tapped.
Photobucket
Related Posts Plugin for WordPress, Blogger...